Industry Day, 28 Nov 2020
On Saturday, 28 Nov 2020, Warlizard Tactical and Heloderm LLC hosted an “industry day” at our favorite firing range. We try to do that periodically, to give our wonderful volunteer range safety officers (RSOs), adjunct instructors, their friends, and family some less structured range time.
Nonstandard Weapons Engineering (NSWE) was on hand at this one, with some of their cool toys.
Our Training Summaries are usually password protected. Because this industry day was an informal affair, and to allow non-alumni to see what they are like, this one will be viewable by the public.
Attack of the Conehead Smurfs
Our warmup drill that day was a classic law enforcement teamwork drill.
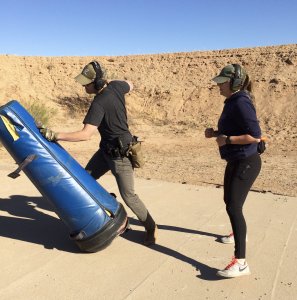
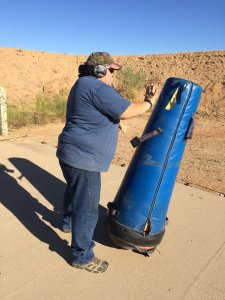
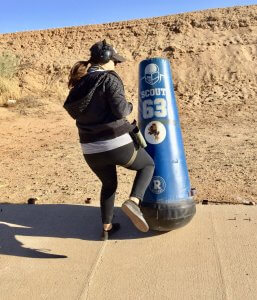
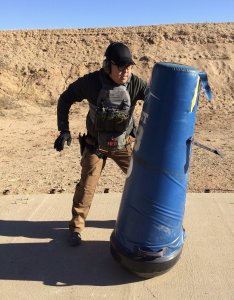
On the left side of the range, we set up an old tackling dummy. I had purchased it from University of Arizona surplus, and it had an Arizona State University Sundevil sticker on it to inspire the troops to organized violence.
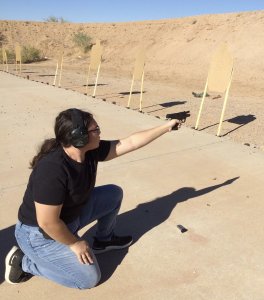
Shooters put their pistols, with at least one spare magazine each, on a table on the right side of the range. Instructors set up each pistol with a stoppage and only a few rounds in the magazine.
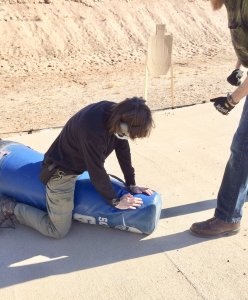
Participants worked in pairs. The winner at paper – rock – scissors went first. S/he started with 30 seconds striking the big Smurf colored truncated cone with the ASU sticker. They could kick, or do palm strikes, elbow strikes, or whatever. They were encouraged to get the cone in “the mount” for a while. If they looked like they were running out of ideas, their coach, a law enforcement Defensive Tactics (empty hands) instructor, threw out some ideas.
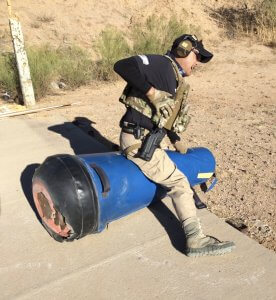
Some learned the hard way that tackling dummies are like Weebles on steroids–they wobble, then fly back up and smack you. The blue truncated cone actually bowled one or two people over.
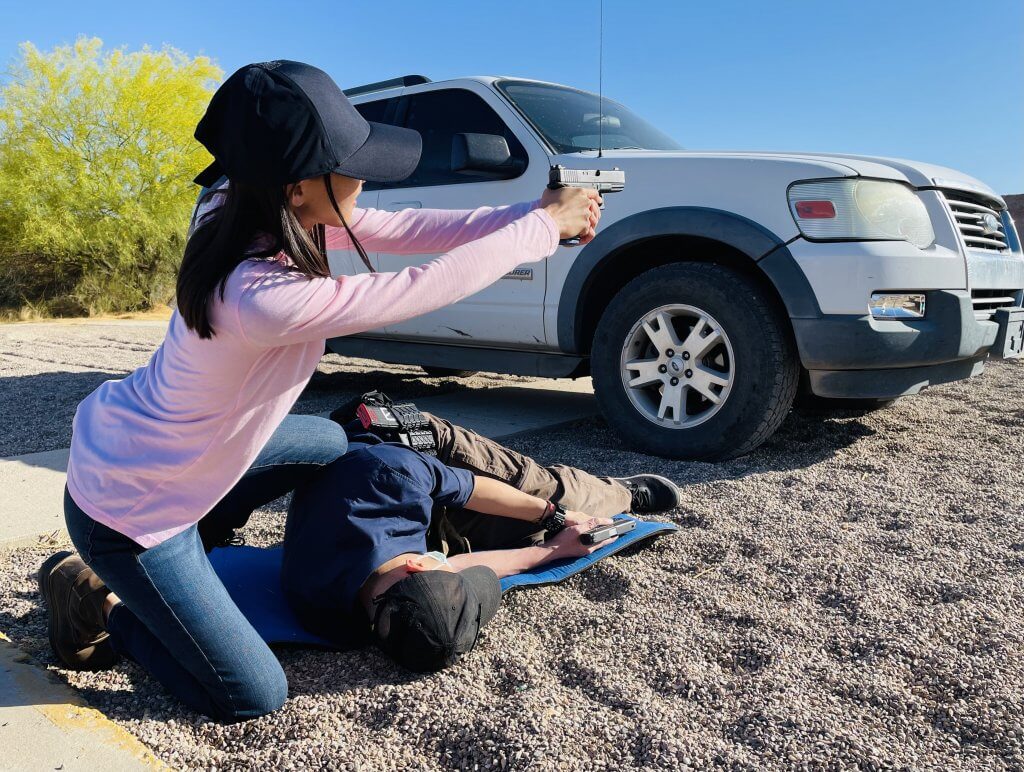
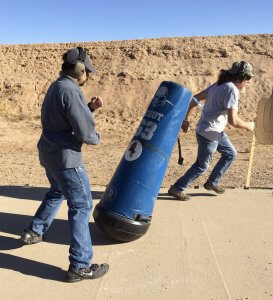
After half a minute of whacking (and getting whacked by) the tackling dummy, partner #2 “tagged in,” and partner #1 sprinted to the table with the guns.
A target was set up in front of the table, not too far away, but far enough that one had to aim (it’s the only one set up past the concrete in the photo below). Students who on a typical range day are excellent shots noticed that unless they took a second to focus and breathe, the exertion degraded their accuracy.
A stoppage was built into the shooting problem. Students cleared the jam and continued to shoot (see below for stoppage reduction procedures).

As in the real world, there was no set number of shots. Rather, they shot until the line officer at the table said “He’s down!” It was also built into the firing problem that before that happened, they ran out of ammo and had to perform a reactive (emergency / slide locked) reload.
When the bad guy “went down,” they placed their pistol back down on the table and sprinted back (about 40 meters) to help their partner, who had been fighting the Conehead Smurf the whole time. As soon as shooter #1 rejoined the hand-to-hand fray, shooter #2 sprinted for the shooting table. We continued taking turns at the tackling dummy and the firing line through two iterations.
If a student started to “dog” their workout on the blue punching bag, instructors gave them a gentle (or not so gentle) shove from behind, to remind them to keep up the intensity.
“Whup-ass is perishable; never use only half a can.”
The point of this exercise is that when working as a team, it’s OK to gang-up on opponents, but you need to make sure your own AOR (area of responsibility) is handled before turning your back on it to assist a partner. Your partner may feel like they are hanging in the wind till you take care of your own issues and step in to help.
It was also a good way to get the blood pumping, and discipline the mind to focus on what’s necessary–trigger control or stoppage reduction or whatever your dire situation requires–through exertion, exhaustion, or distractions.
The following teams participated in the warmup:
- Martin C & Emma H-S
- Terence “T” L and Charles “Panda” M
- Andy & Jake W
- Rob M & Brian T
- Nick B & Dashiel “Dash” K
- Sarah B & Ben D
- Michael G & George H
Purges, and Flashbacks to the Missile Field
Michael and I worked the Conehead Smurf drill last. Michael started ahead of me. When it was my turn on the tackling dummy, I kept up the intensity by venting my frustration at having spent 6 years of my life, that I’ll never get back, watching grass grow for a living in the missile fields of the northern tier. (Charles also gave me a shove or two to keep me going.)
I haven’t guarded nukes since the previous century. That was a long time ago. What, you might ask, made me think of it while we were fighting the Conehead Smurf?
That blue tackling dummy reminds me just a bit too much of a MIRV–one of the “multiple independently targetable reentry vehicles,” nuclear warheads, from a Minuteman III or Peacekeeper missile. Imagine a cone with about the same taper, but about a foot taller, skinnier, very pointy, and a darker paint job.
When I guarded a nuclear weapons storage area (WSA) in Wyoming, one thing we had to do before closing up a bay and setting the alarms was to purge it. A purge is simply walking through to make sure no one is hiding in there to do nefarious things after you lock up.
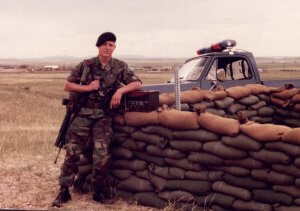
I haven’t accomplished much in my life, compared to many people (for example, Kadar in the paragraphs below), but one thing I can say, that not many can, is I’ve been close enough to thermonuclear weapons to touch them. Can’t remember if we had the 170 or 335 kiloton varieties (I imagine the distinction would be somewhat academic on the receiving end), but it was surreal knowing each of those cones could flatten a city.
You may not be securing a WSA, but purging is something you should do on a regular basis. No, I’m not talking about getting rid of junk that doesn’t give you joy–although maybe you should do that too from time to time–and I’m not talking about bulimia.
You should purge your house when you get home. Walk through your house or apartment–all of it–to make sure you haven’t interrupted a burglary in progress. Check anywhere big enough to hold a man. Make sure there are no uninvited guests, no broken windows or missing window screens, no open exterior doors that were locked when you left, before you secure your firearm, strip down to your boxers, and park yourself in your favorite chair in Condition White (if you don’t know what the Color Codes of Mental Awareness are, take our Level 1 Defensive Pistol course).
Obviously, you wouldn’t need to do a purge if other members of your family are already home. But if the house has been empty–particularly if it is always empty at specific times every week–you absolutely should.
A purge is not conducted with the same intensity as a Search and Clear when you are expecting trouble. If you are–say, you came home and the door is busted off its hinges–DON’T GO IN, even if you think the bad guys have already left. Call the cops. They have better gear, and lots of friends to help. Hunting bad guys by yourself, when you expect to make contact, is a fool’s errand.
But it doesn’t hurt to practice some building clearing techniques while you purge. See as much of a room as you can from the outside before you go in. Mind the deep angles and the hard corners. You can make it a game with your kids by having somebody “pin” the hall while you dump into a room. We cover how to pan doorways, slicing the pie, and other ways to maximize your advantages in confined microterrain, in some of our courses. Or we can always arrange a private in-home consultation for you.
Purging is not paranoia. It is piece of mind. Nobody can stay in Condition Yellow all the time, nor should they. It’s OK to be in Condition White when you are behind locked doors watching the game on TV–but only if you are certain there are no uninvited guests in there with you.
Playtime
After the warmup, most of the participants moved to an adjacent range. I heard fully automatic fire and what might have been suppressed weapons from that direction.
Kadar and Jenée
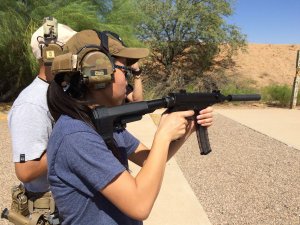
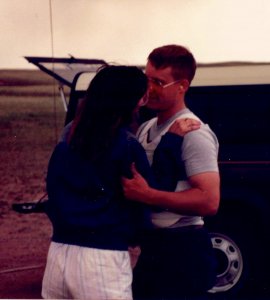
One of the most interesting couples I met on 28 Nov 2020 were Kadar and Jenée H. Kadar had attended a Warlizard Tactical Pistol Fundamentals clinic two weeks before, when fellow instructor Greg G and I had been camping and blasting–I mean, uh, “practicing our winter survival skills and Alpha testing new courses of fire.” Kadar had brought Jenée to us on 28 Nov for more punishment–I mean, “ballistic couples therapy.”
We always take it as quite a compliment when someone trusts us to train their spouse. Some spouses have a “drug problem”–their significant other drug them to our training–but Jenée was totally on-board with the idea that it may be a good time in our nation’s history to become skilled at arms. I couldn’t agree more. Based on my limited experience, there’s never been a bad time. Kadar trains martial arts, and he’s a very big, very fit guy, but he’s only one man. Firearms can help even the odds against a crowd.
Learning how to fight with a firearm starts with learning how not to smoke your family members with it by accident. Joel and I reviewed the Four Universal Caveats of Firearms Safety with K&J:
- Treat every firearm as if it is loaded. The only exception to “all guns are always loaded” is the one you need right this second to save your life, so every time you pick up a firearm, or put it in your holster for carry, ascertain it’s loaded condition.
- Never point it at anything (or anyone) you are not willing to destroy. In many of our classes, we differentiate between a functional firearm and a demilitarized, or non-working firearm or simulator. It’s OK to point a non-functioning firearm at your training partner to practice disarms, but never just an “unloaded” one, as there is no such thing as an unloaded gun. Refer to Rule #1.
- Keep your FINGER OFF THE TRIGGER, up alongside the frame, until you have made a conscious decision to shoot.
- Know your target. Know:
- What (or who) it is
- What is behind your target
- What is between you and your target, and around your target.
I remember mentioning that “Guns and booze don’t mix” is NOT a firearms safety rule. It’s an alcohol safety rule. ETOH doesn’t mix with handling chainsaws, or driving, either.
I like to think of myself as a skilled trainer–been in the biz for nearly four decades–but I had difficulty training my lady at first. Sometimes I still do.
Fortunately, when she was just starting out like Jenée was, the Laramie County Sheriff’s Department offered free defensive handgun classes for females. They liberated my bride from the “performance anxiety” she felt trying to learn something new, something that was important in my life, in front of me.
On 28 Nov 2020, I had planned to go to the other range with our RSOs, who had requested some training on team tactics. Joel was doing an excellent job of coaching Jenée. Kadar was nearby. I wasn’t sure whether Kadar’s moral support was helping or hurting Jenée. She did not appear to be struggling, and was giving off no obvious signs of distress, although like most new shooters she may have been feeling like she was a bit out of her element.
I’m not a gambling man, but if I were I’d never win big, because I would always play the odds. The odds with couples are, the spouse’s presence is more likely than not to be a distraction at best. I started chatting with Kadar, mainly to distract him and give Jenée a little more breathing room. I wasn’t planning to do it for more than a couple of minutes. Like I said, I had an appointment with our RSOs.
But I found Kadar to be a fascinating guy, and imminently trainable. Well, he should be. He had a degree from a prestigious institution, and had been a college athlete (I found out later he had also played professionally). Kadar has an inquisitive mind, and well understood that getting good at any psychomotor skill simply won’t happen without effort. Apart from making me feel like a total underachiever, he was a great student. A week later, at a Pistol Fundamentals clinic, I got to spend a little time with Jenée, and found her to have the same focused, disciplined mindset toward firearms training.
Kadar absorbed everything I threw at him, like a sponge. He worked at it till he got it right–which never took him too long. And then he wanted to know more.
What started out as a few pointers turned into a mini Pistolcraft clinic.
Press Checks
I showed Kadar how to bring the pistol up to his “workspace” for manipulations. He learned a few different ways to press check the chamber, to ascertain it’s loaded status, something you should do any time you pick a gun up. I had him mostly doing the Roll left, Squeeze the slide in the web of the support side thumb method. Kadar had big mitts and did not appear frail by any stretch of the imagination, so he had no problem pulling the slide back. I told him to not only let it fly after the chamber check, but rather to pull it into battery by pulling forward on the slide. Kadar had no problem doing the check, but when “pulling forward” on the slide, his hand tended to keep going forward off the slide. Gripping the slide more tightly during this process, and focusing on stopping your hand when the slide does, should help prevent that. We don’t want our support hand forward of the muzzle if we can avoid it.
Fixing Jams
We worked on firing to different directions–not just squared to the target–and Flow Chart Stoppage Reduction. Whenever our pistol goes “click” instead of “Bang!” our immediate response is to
- Tap the bottom of the magazine
- Roll the pistol right (regardless of our own handedness) and
- Rack the slide to the rear, letting it fly
If anything more serious than a Type 1 (failure to chamber / failure to fire) or Type 2 (failure to eject / “stovepipe”) happens, the first step is to MOVE expeditiously off the X. Then, along the way, you can Rip – Reload – Rack, but movement out of the kill zone (ideally to cover but mainly to anywhere but where you were when you got ambushed) should be your first priority.
- Rip the magazine out of the pistol
- Reload the magazine, rocking it into the well from the front
- Rack the slide to the rear and let it fly
We normally rock the magazine into alignment with the mag well from the rear (“flat finds the flat”). However, when are fixing a stoppage, the top round is often sticking a little out of the front of the magazine. You can reseat it with the tip of your index finger, but most of the time just rocking the mag into the well from the front (starting with the bottom of the magazine farther forward, in relation to the pistol) will accomplish the same thing.
On rare occasions, the top cartridge is sticking almost completely out. If it is, rocking in from the front may cause it cot pop out of the feed lips on top of your magazine, in the mag well. The cartridge won’t be able to fall out–the mag is underneath it–and the mag won’t go all the way in, because the lose cartridge is in the way. Pull the mag out, letting the cartridge fall out of your way, and re-seat the magazine. You may be able to keep this from happening by flicking the top cartridge all the way out of the magazine with your index finger before attempting to re-insert it in the gun.
Rip – Reload – Rack works great with almost all modern striker fired pistols. If it won’t work for your particular brand of pistol, Lock – Rip – Rack – Rack – Tap – Rack – Reassess.
- Lock the slide to the rear with the slide catch, This takes pressure off the top round in the magazine, which is likely stuck on the feed ramp halfway out of the magazine.
- Rip out the old magazine. Stow it under your gun hand pinkie or, if you have a plethora of spare mags ON YOUR PERSON, toss it.
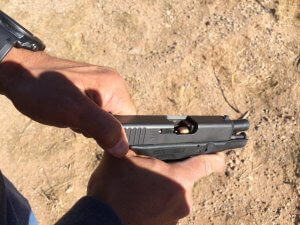
- Rack the slide to the rear and let it fly at least twice. If it goes into battery (all the way forward) by the second try, it’s likely your action is clear of cartridges / cases. If in doubt, lock it to the rear and look. If something is wedged in there (it’s rare but sometimes a round can get in there backwards–see photo of Brian’s below), hold your gun hand thumb upward against the slide catch to hold it open while you hold the gun muzzle up and shake it to let gravity help you. You may need to noodle up in the magazine well with your support side fingers, or ram a pen or pencil down the barrel to clear out something stuck. If the latter is the case, don’t reload and fire till after you’ve seen the pen sticking out both ends, indicating the barrel has nothing lodged in it.
- Tap in the old magazine, or a fresh one. If the top round is halfway out you can push it back in with your fingertip, or flick it out with the same finger, or simply feed the mag into the well from the front and the front of the well should push it back in when you’re doing this. Rarely, a loose top round pops out as you re-insert the magazine. If that happens, you may hear the round rattling in there during training, but that’s not likely during a fight with loud gunfire and possible auditory exclusion. Your main indicator will be that the magazine will stop about the width of a round from going all the way in. Pull the mag out, keeping the mag well (the grip of the pistol) vertical; the loose round will fall out so you can seat the mag completely.
- Once the mag is in place, you’re not quite there. You’ll have to Rack the slide again to chamber a round.
Obviously, this is a time-consuming process. The situation may have changed during all this gyration, which may force you to re-think your use of force decision. But you won’t be thinking about much of anything if you got a bullet through your brain because you just stood there while you did all that manipulation with your pistol.
You MUST move.
“He who plants his feet will find the rest of himself planted shortly thereafter.”
–Gabriel Suarez, victor in several gun battles
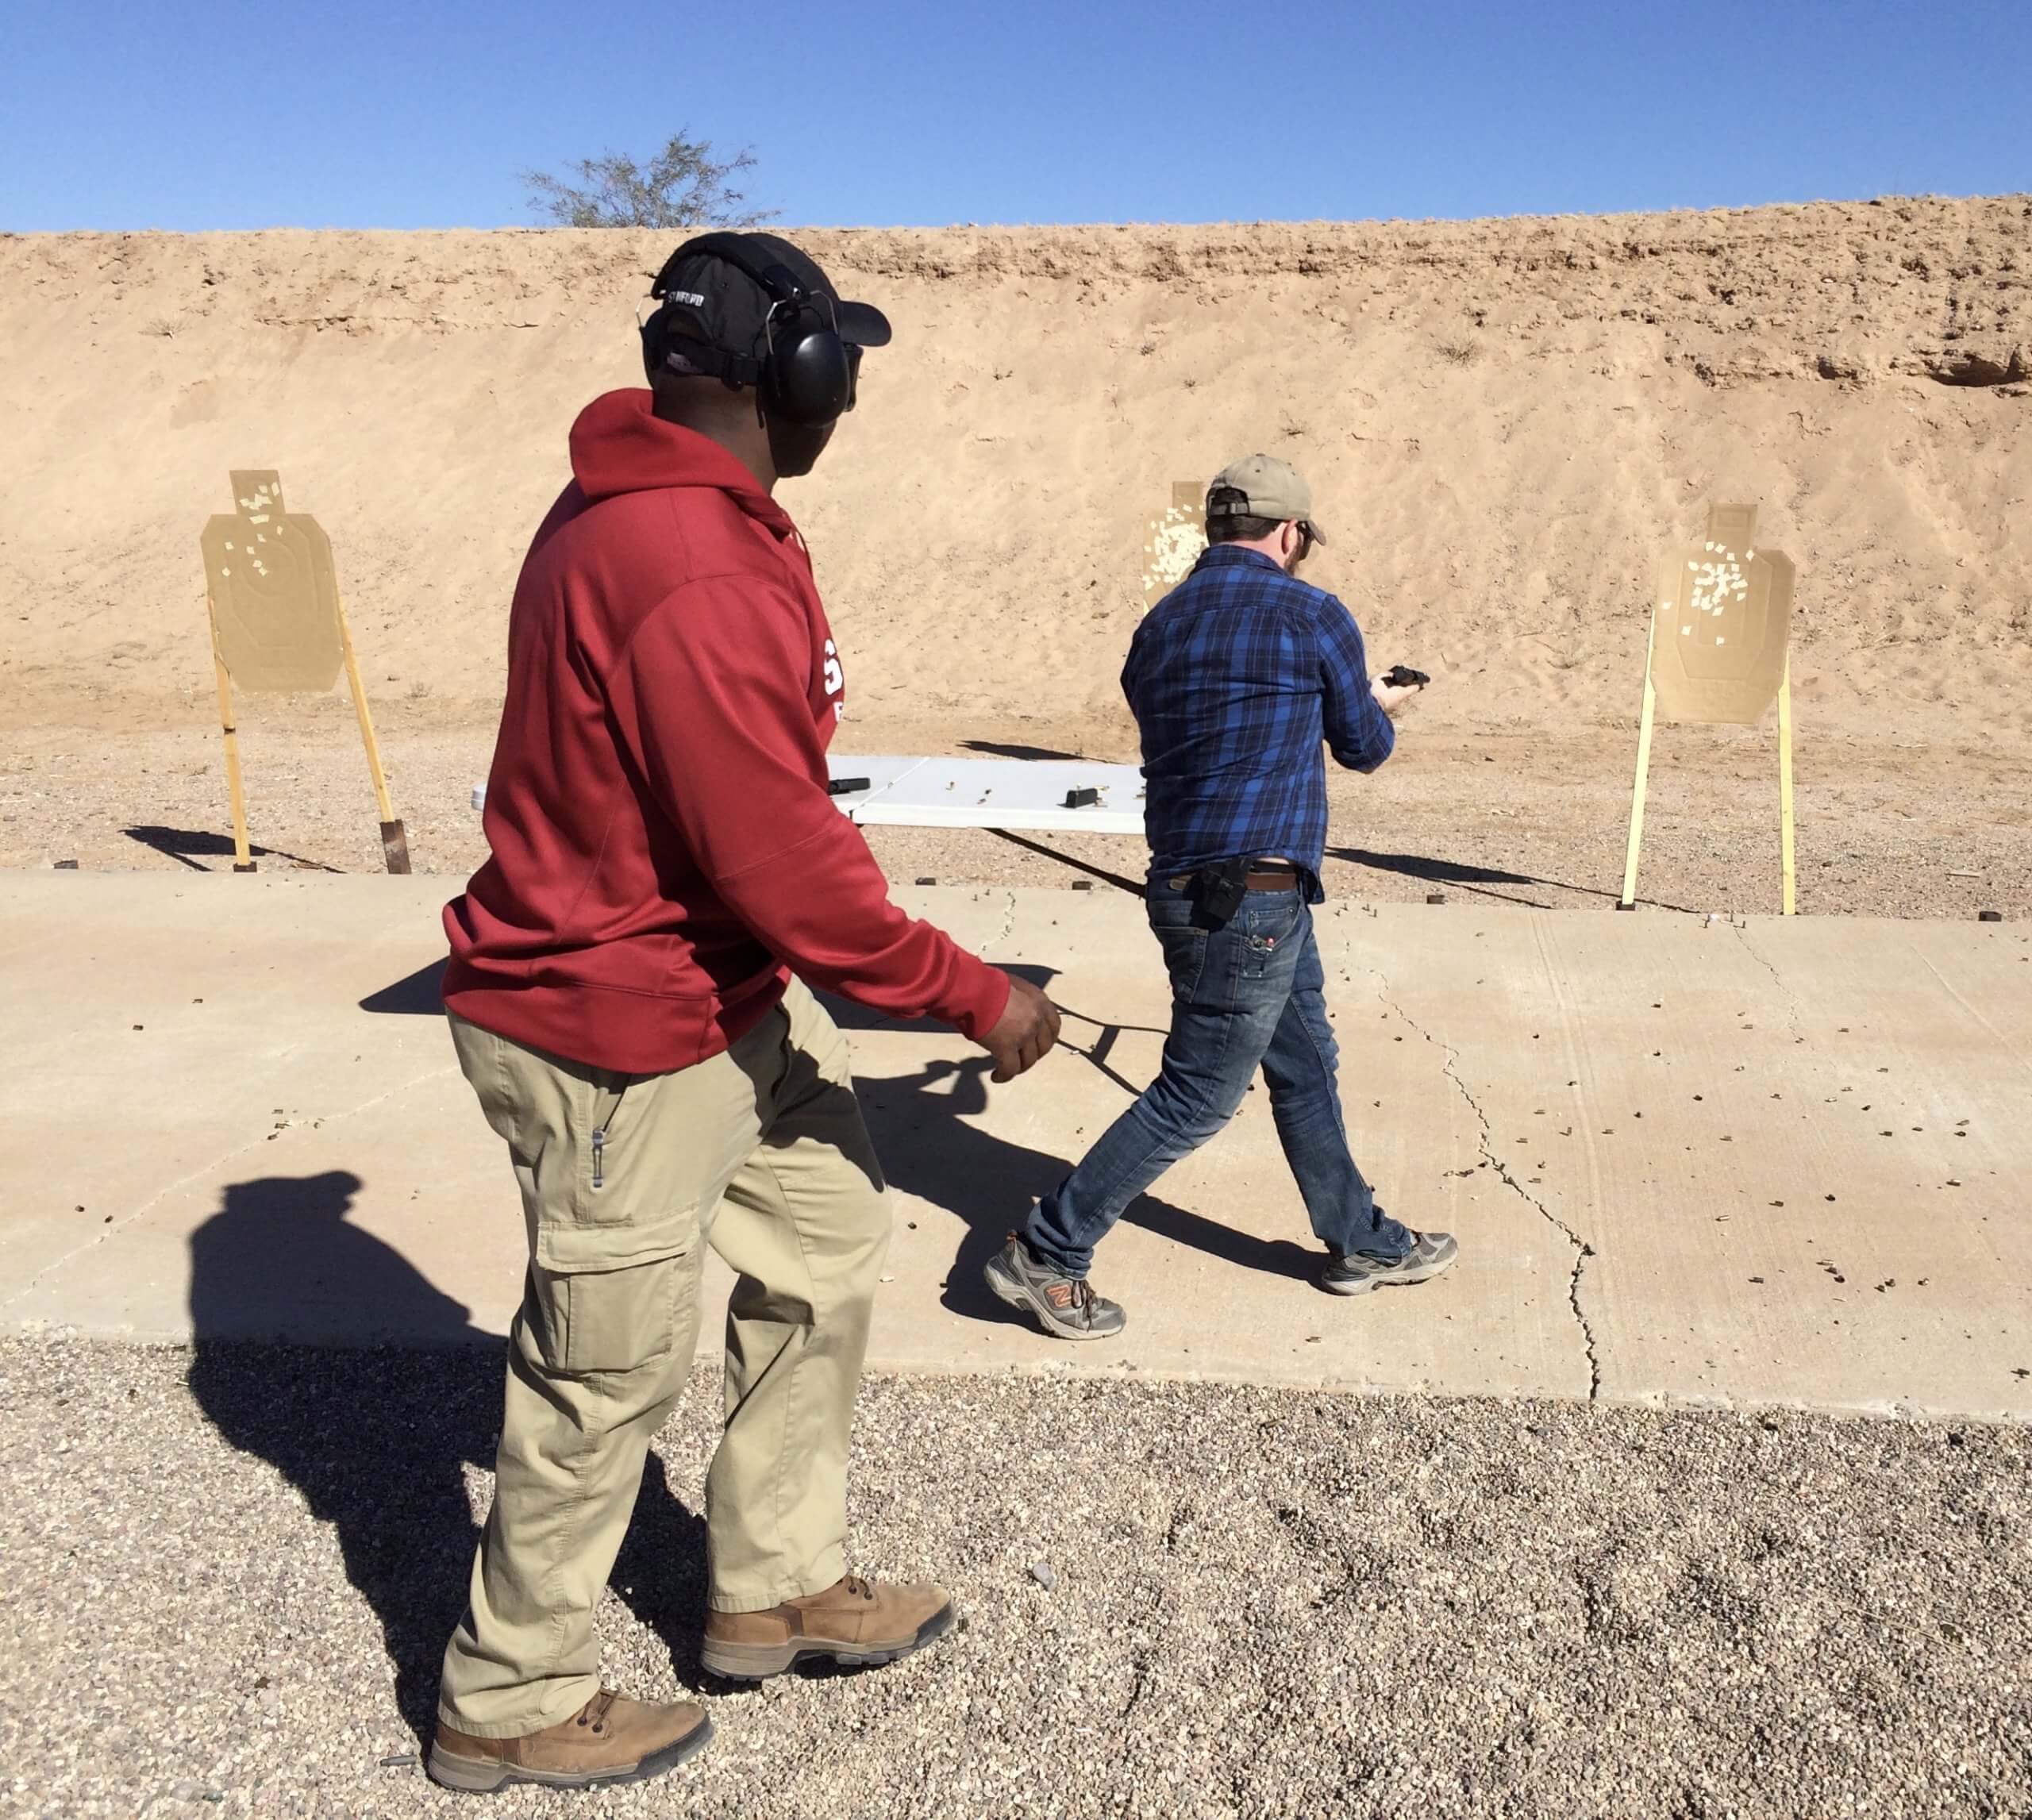
Accordingly, as soon as Kadar knew the basic steps, we had him practice them while moving to the right. Terrain and circumstances will dictate your actual direction of movement, but it causes fewer muzzle direction issues on the firing line to move toward the side of the gun hand, and Kadar was right handed.
This was NOT a class about how to shoot while moving. We cover that at real speed in our Running ‘n’ Gunning courses. Rather, this was to program the habit of getting off the X any time your gun doesn’t go bang, and then to KEEP moving while fixing the problem and returning fire.
I have taught PJs and SWAT teams. When we were doing a movement drills, the operators usually had no problem moving their feet while firing. That was, after all, the drill. But often, when they ran out of ammo and had to reload, or experienced any sort of jam that needed to be cleared, they came to a screeching halt. That’s not because they weren’t trained. Rather, it’s because they were.
The pararescuemen, police officers, and special agents I’ve taught had to qualify with their weapons periodically. Because we usually qualified people en masse, little or no movement is involved. Wouldn’t want people getting ahead of or behind one another, or stepping on each other’s toes, on the firing line. It’s only been in the last decade or so, for example, that the Arizona Peace Officers’ Standards and Training board approved a qualification course of fire with SOME, limited, movement up close. Likewise with some few portions of the AFQC (Air Force Qualifying Course) for M4. Consequently, of the hundreds or thousands of times those operators reloaded, the vast majority were during qualification fire, so their feet were stationary the vast majority of the time.
Primacy of Training to Training Scars
We call this primacy of training. In a life-threatening crisis, you will likely fall back on the way you practiced it first and most. If your primacy of training was sub-optimal, you will carry that “training scar” into any confrontations you find yourself in.
“But,” you think, “your feet have nothing to do with how you reload.” That may be true to your conscious brain, but not to the subconscious part of your brain that programs neural pathways for psychomotor skills. That part records ALL the sensory and muscle inputs: what you saw, heard, smelled; what your fingers were doing; what your elbows were doing; what your legs and feet were doing. That way your muscles–all of them–can do what they’ve learned the next time you do that skill. That’s also why, every time I hear a song from Peter Frampton’s Frampton Comes Alive, it takes me back to a 1967 Plymouth Barracuda on Prom night.
So as early as possible in a shooter’s education, we try to introduce movement while they work various skills.
Another problem with most firearms education is that it is entirely marksmanship based. Marksmanship is important–it can be critical–but it is far from the whole picture. Few schools teach how to avoid confrontations (we do, in our Defensive Pistol classes), and fewer still let the students practice the verbalization or other skills necessary for an effective challenge. Yet defensive display of a firearm without having to shoot is the skill used most often on the street by armed citizens and police officers alike.
Nor do most schools teach what you will need to do after a fight. Accordingly, Kadar and I reviewed Randy Harris’ excellent FAST mnemonic for trans- and post-fighting protocols.
- Fight
- Assess–Is he down? Is he staying down?
- Scan for other threats
- The T‘s, or Wyatt protocols, which can include (in order which may be dictated by circumstances):
- Take cover
- Top off your weapons system (proactive reload / mag exchange)
- Talk to whomever needs talking to–911, suspect, loved ones, bystanders
- Treat injuries–glance for blood and feel with claws not paws
- Take off–leave, if you feel threatened by a hostile crowd
- Trade up to a better weapons system (yours or his)
For more information about PESTS EAT FAST, read Harris’ outstanding article “Dealing with PESTS.”
While Kadar was getting some reps (repetitions, or repeated practice of the same skills to program the so-called “muscle memory”), Jake, son of our good friends Andy and Trudy, approached. He had seen what we were doing, and wanted to get in some “shooting while moving” too.
Again, this was not about shooting while moving. There are specific techniques we teach that can help with that. But it was an excellent opportunity to cement what we’d been covering into Kadar’s brain, using a very effective adult education model.
“See one, Do one, Teach one,” I said to Kadar. “Teach Jake what I’ve just been teaching you.”
Kadar ran Jake through the paces of stoppage reduction and returning fire while moving. I was astounded how much of it, especially FAST, Kadar had absorbed. He didn’t just remember what the letters in the acronym stand for. Kadar was able to explain WHY to Jake, not just parroting what I had said, but in his own words, indicating deeper understanding.
Jake was starting to get it down when two other friends and members of our student family, Brian and Crystal T, joined the party. Crystal is Brian’s adult daughter, and she’s pretty bad-ass. Brian still bore the marks she had given him with Airsoft in a Violence Avoidance and Survival class.
From there on out, it turned into an ad-hoc skills clinic.
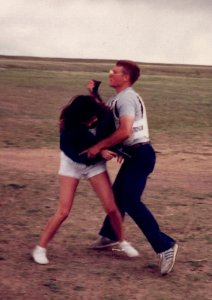
Jen Fulford drills
We started with drills named after Orange County, Florida Deputy Jennifer Fulford-Salvano. Her story is a testament to the effectiveness of good training, as well as to the gigantic size and brass composition of her ovaries.
Students put their pistols on the ground in front of their feet. Each held their hands (“finger pistols”) out as if firing, while someone slapped them on the strong side deltoid to simulate their being hit and injured, causing them to drop the gun. They stooped down, picked up the pistol with their support (“weak”) hand, and shot the target.
When replicating this drill, it’s important for you to hit your training partner hard enough to sting a little. You don’t need to draw blood or cause permanent damage, but it has to hurt. Telling someone their arm is out of commission does not drive the message down into the lizard brain as well as even a modicum of pain does. When programming stimulus response, it helps to at least simulate the stimulus. Sanford Strong, a retired San Diego SWAT cop, put it this way:
“The crucial and most overlooked juncture is expecting to get hurt. ‘Expect to be injured,’ maybe seriously, is a gaping hole in too many crime-protection plans. It is crucially important because a person who is not prepared to be injured is not fully prepared against violent crime. Most people, including police officers, have never been seriously injured, let alone shot or knifed. Without the expectation of injury, injury freezes everyone up. Visualize yourself being shot or stabbed ahead of time and you minimize the chance you’ll freeze up if it happens.”
—Strong on Defense, p. 36
You Can’t Keep a Good Man Down . . .
. . . But if He’s Smart, He’ll Stay There
Crystal figured out, intuitively, what I would’ve told them eventually. If you have to kneel down to pick up your gun, it’s faster to shoot from that kneeling or squatting position than it is to stand back up, and then return fire.
Obviously, this is situationally dependent. You might scoop up the gun on your way to cover. And unless you need to get a clear line of fire, you wouldn’t want to kneel down close enough to the subject for him to punt your head. But if your pistol drops behind some sort of cover (say, the front of a car) or concealment (your kitchen island or bed) why not stay there to return fire?
RSO and former infantryman Martin C says it goes in this order:
- Return fire
- Move to cover
- Return EFFECTIVE fire
Dominant Hand Only drills
Then we did something like Jennifer Fulford had to, only with the dominant hand only. Shooters started with both hands on the pistol, and got slapped on the support side deltoid. Dropping the support hand off of the pistol, shooters drove on with their dominant (gun side) hand only. A few finer points:
- When somebody has a gun out, we don’t want to hit them farther down on the arm, which could move the gun around and perhaps lead to an unintentional discharge. Hitting the deltoid (the outside of the shoulder) conveys the idea that the arm is out of commission without actually disturbing the aim.
- Marksmanship based schools encourage one handed shooters to tilt the pistol slightly inboard. This old bullseye shooter technique cuts down on tremors. However, in a fight for your life, you should roll the gun vertical. This does a few things for us:
- It tightens the muscles of the arm, helping us control recoil with one hand better, for faster follow-on shots.
- Especially if we are running, it keeps the vertical axis of our dispersion pattern in line with the long axis of a standing human target.
Dominant Hand Only Reloads
When teaching one-handed only reloads, it helps to start with the dominant hand, as it is easiest to learn–especially if you are wearing a holster.
When the slide locks open, hold the magazine well vertical as you press the mag release button. You can move the whole pistol down and up with a rapid vertical pump to help the magazine out, or give it a Costas / “John Wick” flip. Incidentally, that is nothing new. Navy SEAL Chris Carracci told us about flipping the empty to the side to keep it out from underfoot during team ops at Gunsite back in 1994, and I don’t think it was a new idea then.
- Holster the pistol with the slide locked open. This works better in some holsters than others; with the slide back the center of gravity is higher and there’s less of it inside the holster.
- Obtain a spare magazine and seat it firmly into the pistol. Try not to knock the pistol out of the holster as you do this.
- Pull the pistol from the holster and send the slide forward. There are a few different ways you can do this:
- You can thumb down the slide catch, if you are right handed or it is ambidextrous.
- You can hook the rear sight on something (belt, stiff holster, boot heel, corner of a wall), push forward on the frame with your gun hand, and release the slide that way.
- Crystal’s rear sight was sloped in front and did not lend itself to hooking. Instead, she had to hook the top front corner of her slide on something them move it sideways quickly so the slide could move forward cleanly.
Many schools don’t teach the latter two methods for fear of Rule 2 (lasering) safety issues. As long as the firearm is pointed down, this should not be an issue, but if it is, you can rotate your body till that hip is up range.
One Handed Reloads–Support (“weak”) Side
Most of us are less dexterous with our support hand, but the main problem is that the holster is usually on the strong side.
Lose the magazine as you would with your dominant hand, except it helps if you push on standard (inward moving) magazine releases with the middle finger. If you use the index finger, which is directly opposite the thumb on us primates, you may find yourself pushing on the opposite end of the mag release with your thumb. Not very productive.
If you have a stiff sided Appendix holster, feel free to stick the pistol in there backwards.
Otherwise, two options were presented.
The first was the kind taught at several police academies. Kneel down and place the pistol on the ground, facing downrange (wherever that is, in the real world outside of a firing range), upside down. If it won’t stay up, you can lean it against your boot. Insert the mag and send the slide forward as described above.
The second is one I learned, I think at a Street Survival seminar, back in the ’80s. It has the disadvantage of “lasering” part of your leg, albeit with a slide locked pistol. Place the top of the slide in the crease behind your knee and kneel down. That locks it in place fairly securely with the mag accessible.
Both methods have the disadvantage of “nailing” you down in a kneeling position, limiting your mobility, for a few seconds.
We did not discuss the seated, between the knees method Eddie Murphy used to reload his Browning GP-35 in Beverly Hills Cop. There are mobility and lasering issues with that as well, but in extremis, do what you have to, to get the gun running again.
“A man gotta do what a man gotta do.”
–Four year old Alex H, announcing he was ready to down another dose of oral chemotherapy, after vomiting the previous dose
One Handed Stoppage Reduction
We covered left and right hand only Type 1 and Type 2 stoppage reduction.
With either hand, the first thing is to tap the bottom of the magazine, hard, against something to insure it is fully seated. A hip will do.
When we’re down to only one hand, we don’t worry so much about workspace, or rolling the gun to the right to let gravity assist the extractor and ejector. One of the leading causes of Type 1 “stoppages” is simply forgetting to chamber a round, or to check that a round is chambered, before strapping on your heater, anyway, so a clean ejection is not your first concern.
However, because it MAY be a concern, we must make sure the pistol is pointed away from us slightly as we hook the rear sight on our belt or Kydex holster and push forward on the frame. This is not for safety (unless you turn your hip, it may in fact point the pistol at your neighbors as you do so). Rather, it is to ensure the ejection port is not up against you, blocking it, as you stroke the slide. Also the slide can hang up on your pants seams if you press the pistol against you.
The method Crystal used, hooking a top front corner of the slide on something, works as well, but when the slide starts in the forward position (as opposed to locked back for a reload), it is harder to find the “sweet spot” between the corner and the barrel. When the slide is locked open, one can simply index (find the right placement) along the side of the barrel.
One Handed Type 3 Stoppage Reduction
We did not practice One Handed Type 3 Stoppage Reduction on 28 Nov 2020. It can be done, but would require more time than we had to train it in a sliver of half-day range session. Also, even when mastered, correcting Failures to Extract / “Double Feeds” one handed is so time consuming it may be more than it’s worth in the close range, high intensity, short duration of most gunfights. Being fight focused, rather than weapon focused, may give you more options in that case.
Part of that fight focus might lead you to draw a secondary weapon, if it can be reached with the non-injured hand. We generally recommend that backup guns / knives / etc be carried where they can be reached with the support hand, on the theory that whatever put your gun out of commission might’ve put the hand holding it out of commission as well.
Or being fight focused might mean going hands-on with the assailant (and / or pitching our seriously stopped up pistol at him, and / or striking him with it like a blunt object).
Or it might mean running away, to live to fight another day.
Conclusion
That fun day lived up to its name, for me at least. Sounded like the folks on the other range were having fun too. We got to play with a lot of basic manipulations, and got the blood pumping a little. Remember to practice those skills early and often. Thanks for being part of our team, even if it’s just by reading this. See you in 2021!
–George H, lead instructor, Heloderm LLC